
An elegant tent lounge is a designed destination—a space that feels intentional, comfortable, and distinctly upscale, even inside a temporary structure. When seating, lighting, draping, flooring, climate control, and service areas are planned as one cohesive interior, the lounge becomes where guests naturally gather, linger, and connect.
This guide shows you how to create that level of polish inside a tent. You’ll learn how to build conversation-ready seating vignettes, layer lighting for warmth and photo-friendly visibility, use flooring and liners to define zones, and integrate climate and bar stations without disrupting the look. The result: a lounge that flows beautifully for weddings, corporate events, and VIP experiences—and feels as seamless as a permanent venue.
What Are the Key Elements of an Elegant Event Tent Lounge Design?
An elegant tent lounge comes from coordination, not clutter. When furniture, lighting, draping, flooring, climate control, and service points are planned together, the lounge feels like a finished interior—comfortable, intentional, and easy to move through. Each element plays a clear role: furniture establishes scale and conversation flow, lighting creates warmth and depth, draping refines the structure, flooring defines zones and improves comfort underfoot, climate control keeps the space usable in any season, and bar/service stations support the guest experience without disrupting the design.
The biggest difference-maker is how these pieces work as a system. A lounge vignette only feels complete when seating is anchored with a rug and table, then “framed” with the right light. In the same way, draping and uplighting should reinforce the tent’s architecture, and flooring transitions should quietly guide guests from lounge pockets to bars, dance floors, and exits. Below are the core building blocks to prioritize when creating a high-end tent lounge:
- Comfort-forward furniture with enough visual weight to form inviting conversation groups
- Layered lighting (ambient + accent + task) to keep the lounge flattering and functional after dark
- Draping/ceiling treatments that adjust perceived height and add softness
- Finished flooring and area rugs that define zones, improve footing, and soften sound
How to Choose the Best Tent Lounge Furniture Rental for Your Event
The best lounge rentals start with strategy, not shopping. Define your guest experience goals first, how many people you want seated at once, how formal the event should feel, and how guests should move through the space, then choose furniture that supports those decisions. From there, evaluate rental options through a practical lens: durability, logistics, styling completeness, and backup plans. This prevents last-minute substitutions that can water down the design.
Use This 5-Point Rental Checklist When Requesting Quotes
- Capacity + flow: Confirm how many guests you’re seating at one time and keep walkways clear so lounges don’t become bottlenecks.
- Budget priorities: Invest in the pieces guests touch most (sofas, lounge chairs, tables) before adding extras.
- Materials that perform: Ask about durability, cleaning protocols, and any required safety specs for tent environments (especially upholstered pieces).
- Delivery + setup support: Verify lead times, access requirements, and whether placement is included (white-glove staging makes a major difference in the final look).
- Styling + contingency: Confirm what’s included beyond seating—rugs, tables, pillows, lamps—and ask what happens if an item is damaged or unavailable.
Once you have quotes, compare vendors by how well they can deliver a complete vignette (not just individual pieces) within your timeline.
Common Rental Tiers (and When to Use Each)
If you want fewer vendors and a smoother build, a single partner who can coordinate tenting alongside interior elements—like flooring, draping/liners, and staging—can simplify project management and reduce day-of risk.
What Are the Most Popular Elegant Seating Options for Tent Lounges?
Luxury lounges typically use a mix of pieces that create both comfort and visual structure: velvet or tailored sofas, leather club chairs, tufted benches, curved sectionals, and designer occasional chairs. Each one sets a different tone—sofas feel elevated and photo-ready, leather reads polished and corporate-friendly, and curved sectionals naturally form semi-private conversation pockets around a focal point. Finish the grouping with low tables and layered rugs so guests have surfaces for drinks and the lounge reads as a complete, intentional zone.
How Do Materials and Colors Affect Luxury Tent Interior Decor?
Materials and color do most of the “luxury signaling.” A strong foundation often starts with soft neutrals (cream, sand, warm gray) and builds in richness through texture—velvet, polished wood, woven rugs, and metallic accents. Jewel tones and darker leathers add evening drama, while muted accents (sage, terracotta, dusty rose) keep the look current without feeling trendy. The most important rule: balance beauty with performance—choose finishes that can handle real event wear and keep the lounge looking pristine from guest arrival to last call.
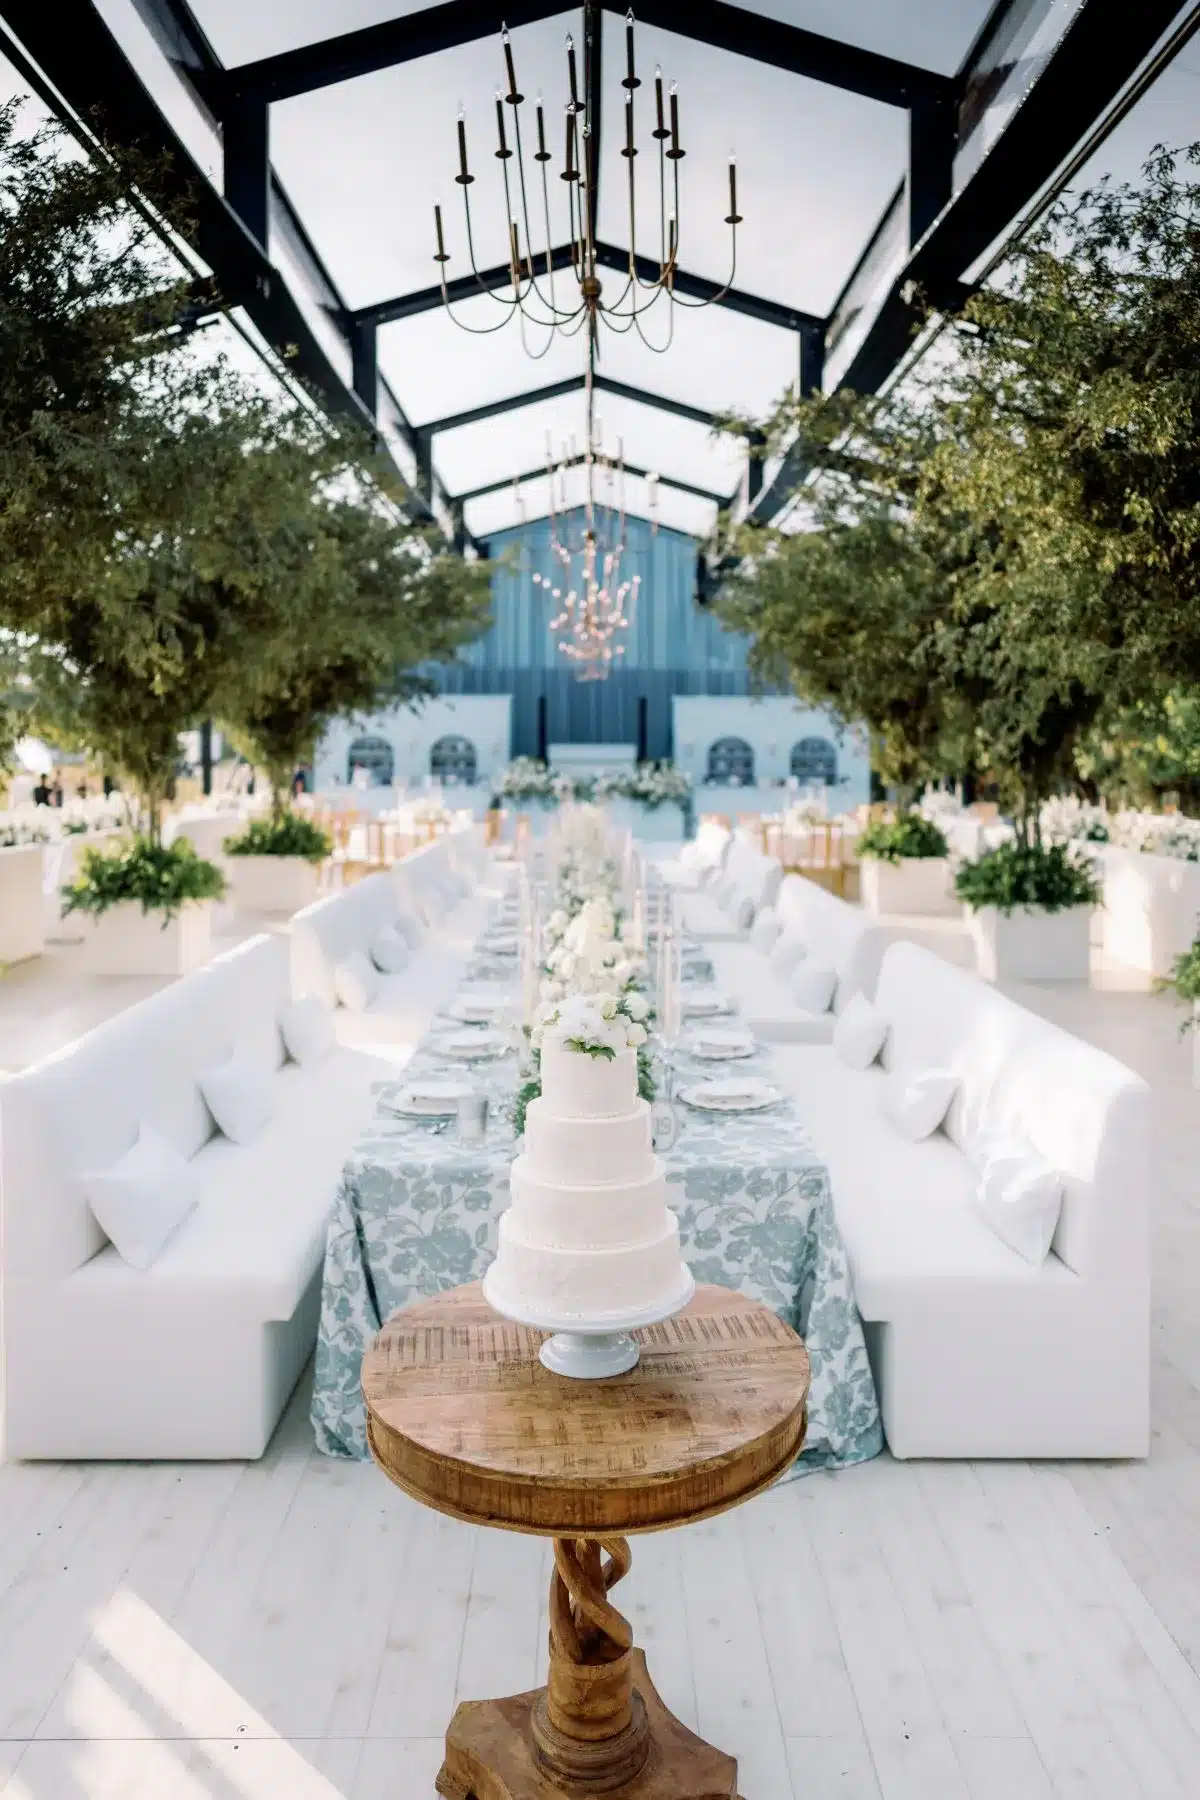
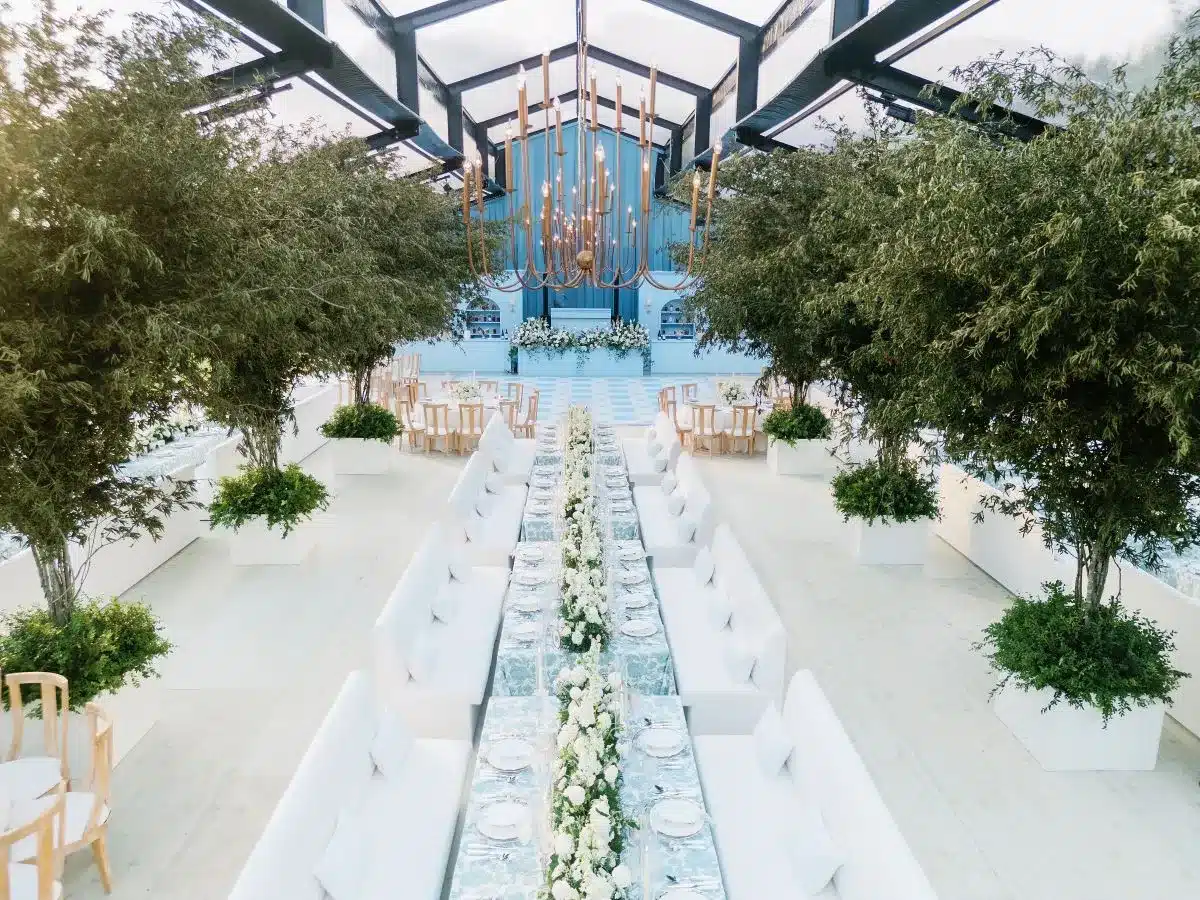
What Tent Lighting Techniques Create a Sophisticated Lounge Atmosphere?
A lounge only feels “luxury” after dark when the lighting is layered—not just bright. The most polished tent lounges combine three layers that work together: ambient light for warmth and comfort, accent light for depth and focus, and task light where guests and staff need clear visibility. This approach makes the space feel intentional, flattering in photos, and genuinely usable throughout the night.
To keep the mood seamless, build the lounge in simple lighting zones (seating pockets, bar/service, circulation paths, and feature moments). Then use dimming or scene-based control so the look can shift smoothly from cocktail hour to speeches to dancing, without anyone noticing the change.
Core techniques that consistently elevate a tent lounge:
- Chandeliers or statement fixtures to anchor main seating vignettes and create an obvious focal point
- Warm string/bistro lighting along circulation edges to add glow, scale, and a welcoming rhythm overhead
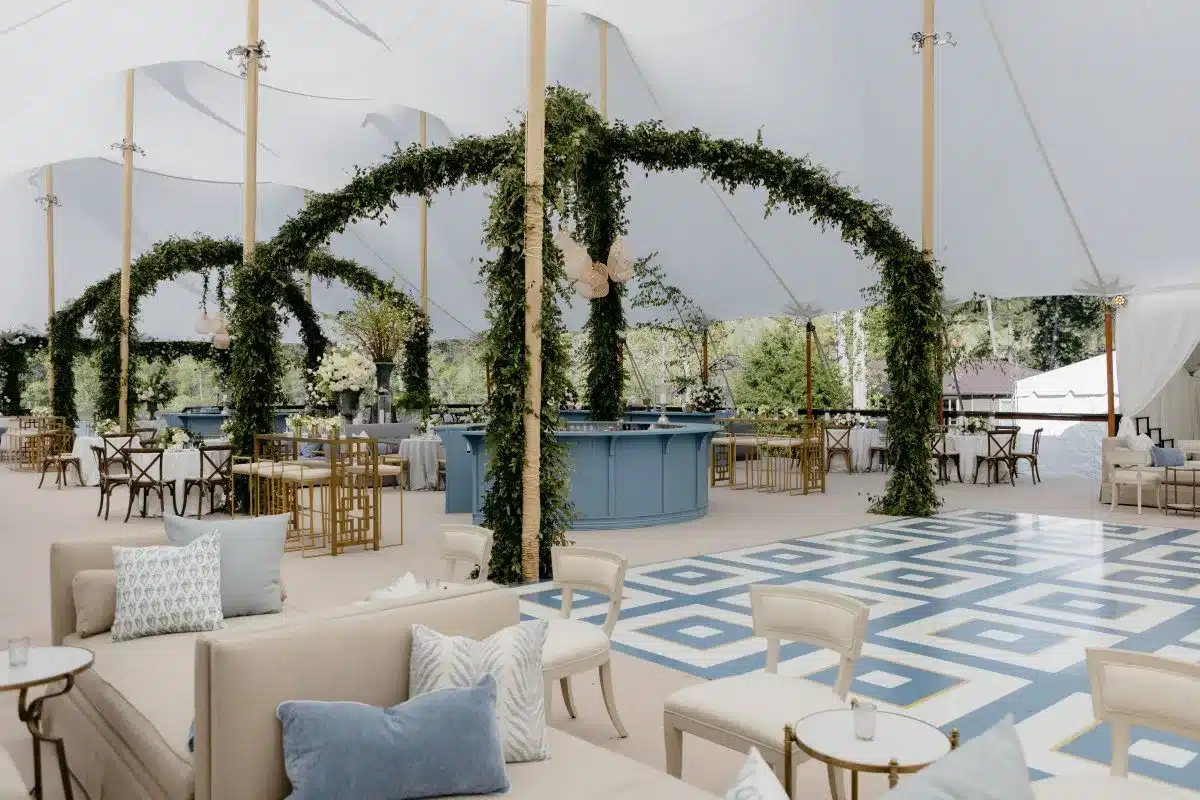
- Uplighting at the perimeter to bring out draping, poles, and ceiling lines—adding dimension instead of flat “wash” light
How to Use Chandeliers, String Lights, and Uplighting in Tent Lounges
Scale and placement are everything. A chandelier should feel proportional to the seating group it serves—large enough to “own” the vignette, but hung high enough to protect sightlines and keep the lounge open. String/bistro lights work best where they support the flow: use them over corridors, transitions, and perimeter areas to create warmth without competing with statement pieces. Uplighting belongs where it can sculpt vertical surfaces—behind liners, along tent walls, and at key structural lines—so the tent interior gains depth and texture.
A few practical rules that keep the result elevated:
- Keep bulbs warm-toned for a cohesive lounge glow
- Use uplighting to enhance architecture, not flood the room with color
- Plan mounting and power early so the install looks clean and intentional (no visual clutter, no last-minute rerouting)
What Are Smart Lighting Solutions for Modern Tent Lounge Designs?
Smart lighting is most effective when it supports the event timeline, not when it becomes the show. Scene-based control—pre-set looks for arrival, dinner, speeches, and late-night energy—lets the lounge shift mood quickly and consistently. Color-tunable LED fixtures can also help match brand palettes or theme accents while keeping power demands efficient.
To keep it reliable:
- Build a few simple, repeatable scenes (instead of dozens of complicated effects)
- Allow time for programming and testing during load-in
- Confirm compatibility with AV needs and the power plan so lighting cues stay smooth all night
Which Flooring and Draping Options Elevate Your Event Tent Lounge?
Flooring and draping are two of the fastest ways to make a tent lounge feel like a finished interior instead of a temporary space. Together, they define zones, soften acoustics, refine proportions, and guide movement—so guests instinctively understand where to sit, where to circulate, and where the “moments” are. The right combinations also protect against real-world conditions like moisture and heavy foot traffic, keeping the lounge comfortable and polished from start to finish.
How Do Custom Flooring and Area Rugs Define Lounge Zones?
Flooring creates the lounge’s “architecture.” It separates seating pockets from service paths and transitions smoothly into dining or dance areas—without needing hard barriers.
- Raised platforms elevate VIP seating or bar moments and instantly signal importance (plan for safe transitions and clean edges).
- Hardwood-look flooring gives consistent footing and an indoor-level finish that reads upscale in photos.
- Area rugs complete each seating vignette—anchoring furniture, adding texture, and absorbing sound.
A simple styling rule that keeps vignettes looking intentional: choose rugs that extend 12–18 inches beyond the furniture footprint so the grouping feels unified, not crowded. For transitions (lounge → dance floor, lounge → dining), use clear thresholds—either a change in flooring material or a defined edge—so guests naturally follow the layout.
Flooring Options at a Glance
Use this as a decision guide: flooring should support the look and the logistics of your venue and timeline.
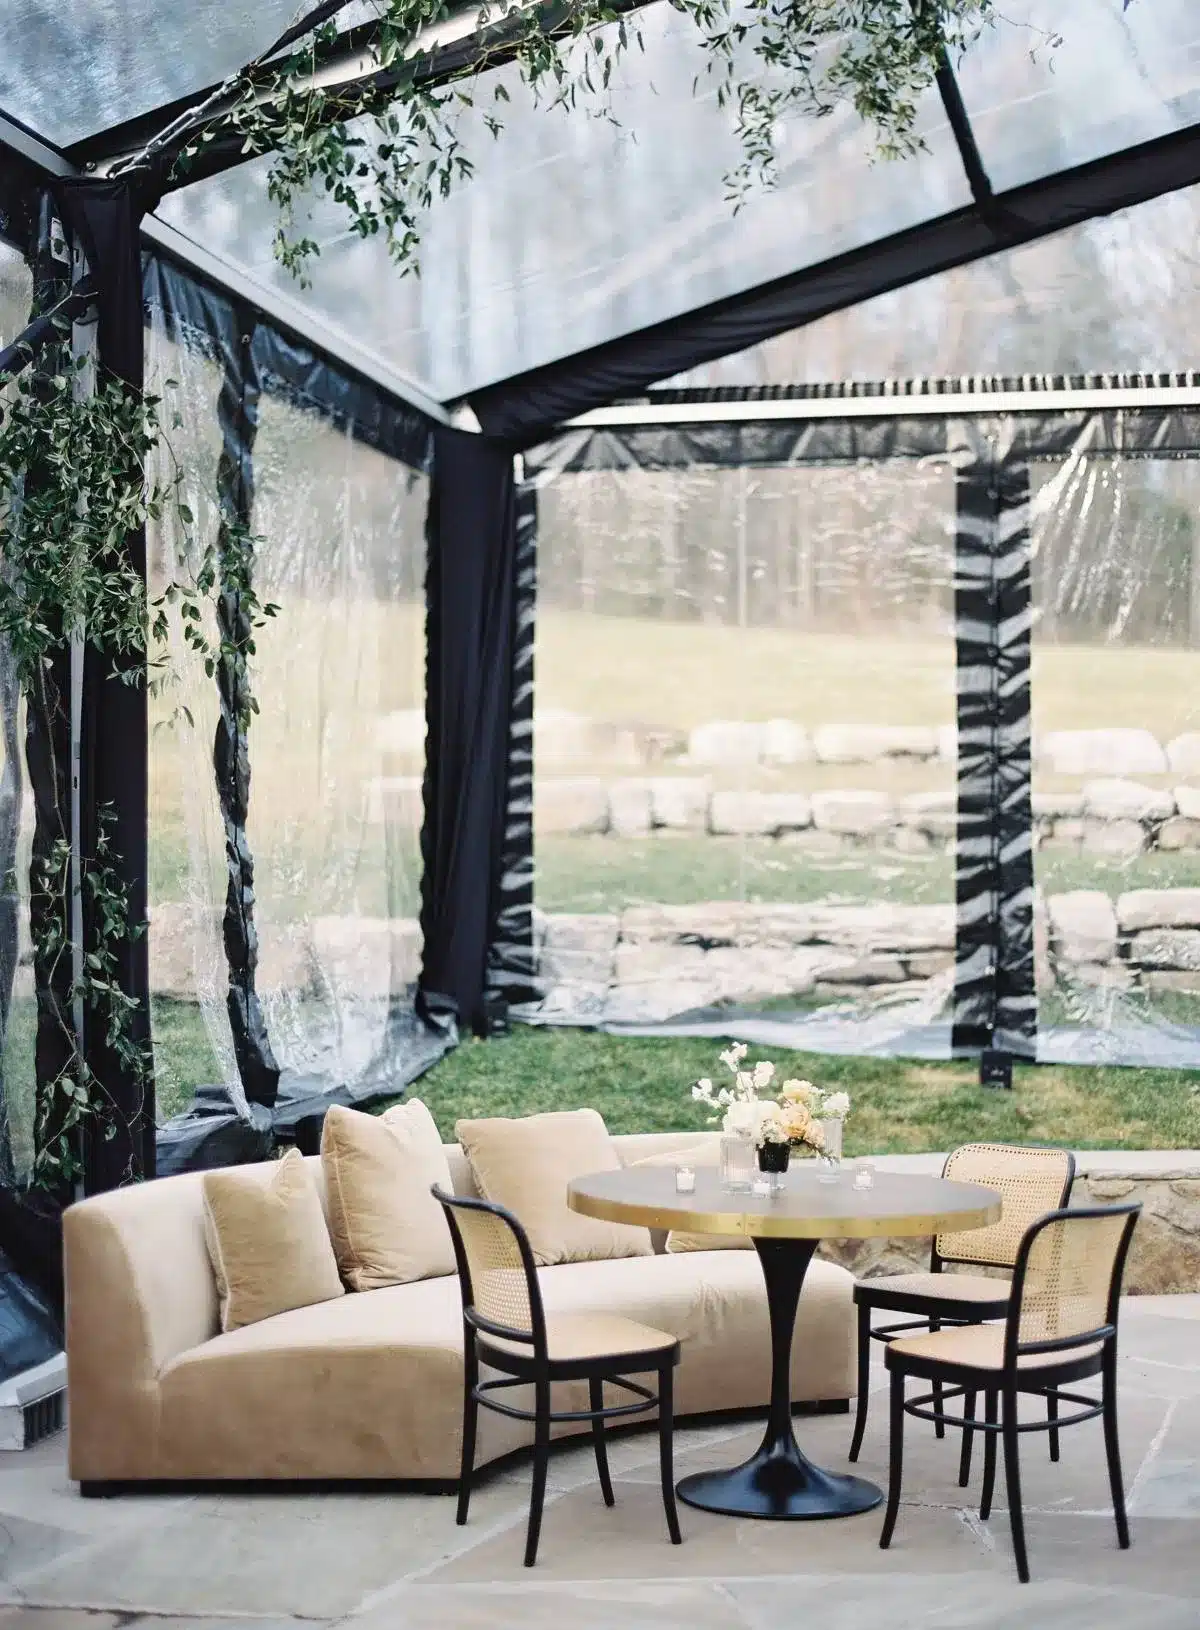
What Draping Fabrics and Styles Add Elegance to Tent Interiors?
Draping is what makes a tent interior feel tailored. It controls perceived height, adds softness, and dramatically improves how lighting behaves across the space.
- Sheer voile keeps the room airy and diffuses daylight beautifully—ideal for a light, refined daytime lounge.
- Satin or smooth liners add subtle sheen that elevates evening events and pairs well with chandeliers and warm uplighting.
- Velvet or heavier backdrops create depth and richness for VIP areas, photo moments, or stage-adjacent lounges.
For a polished result, prioritize clean tension and consistent coverage—well-installed liners hide structural and technical elements, making the lounge feel seamless and upscale. Coordinate drape colors with your lighting plan (especially perimeter uplighting) to build dimension without overpowering the space, and always specify materials that meet applicable safety requirements for tent environments.
How Can Climate Control and Bar Stations Enhance Comfort and Functionality?
A luxury lounge only works if it stays comfortable and easy to host in. Climate control and bar planning are the behind-the-scenes elements that protect the guest experience—keeping the space inviting in any season and preventing service from disrupting the design. When temperature, humidity, power, and service flow are addressed early, the lounge feels effortless: guests linger, staff can operate smoothly, and the interior finishes (rugs, upholstery, liners) stay looking pristine.
What Climate Control Solutions Ensure Year-Round Lounge Comfort?
The right solution depends on the tent type, season, and guest count, but the goals stay the same: stable temperature, controlled humidity, and minimal visual impact.
Common approaches include:
- Portable HVAC for warm-weather cooling and humidity control (especially important for textiles and flooring)
- Ducted heating for consistent warmth in larger builds
- Radiant heaters placed strategically to warm people and seating zones without making the air feel overly dry
Sizing should be based on the tent’s volume, ceiling height, and occupancy, with power planned alongside lighting and other site loads. The biggest success factor is coordination: routing ducting and placing units so they don’t interfere with draping, sightlines, or key lounge moments. When climate and power are planned with the tent structure from the start, the space stays comfortable without looking technical.
How to Integrate Stylish Bar and Beverage Stations in Tent Lounges
In a well-designed lounge, the bar feels like a feature—not a traffic jam. The best placement is visible but not dominant, positioned where it naturally draws guests without cutting through seating pockets.
Design + flow guidelines that keep it elegant:
- Place the main bar as a perimeter anchor with clear approach and exit paths
- Add secondary points (carts, satellite bars, backbar islands) near high-traffic lounge areas to reduce lines
- Match finishes to the lounge palette (wood/lacquer for classic; metallic accents for glamour; clean modern fronts for contemporary looks)
- Keep the functional side discreet: storage, trash, and refrigeration should be accessible to staff but visually minimized for guests
Plan utilities early—power for refrigeration and bar lighting, plus any waste management needs—so service runs smoothly and the lounge stays clean, calm, and uninterrupted.
What Are the Best Layout and Flow Strategies for an Elegant Tent Lounge?
An elegant lounge layout feels effortless because it’s built around three priorities: clear zoning, strong sightlines, and smooth circulation. Start by placing your most important seating moments near natural focal points (a chandelier, a feature wall, a bar moment, a stage view), then protect the flow with generous pathways so guests never have to squeeze past conversation groups. As a rule, keep 36–48 inches clear on primary corridors and position bars/service areas so they support the lounge without cutting through it.
Great lounges also include “layers” of intimacy. Use seating density, lighting levels, and flooring/rug transitions to create zones that feel public (high-energy), semi-private (conversation pockets), and quiet (two-seat moments). When sightlines connect these zones—so guests can visually understand where to go next—the space naturally guides movement without signage or barriers. Finally, build in accessibility and safety from the start: keep egress routes open and ensure ramps/thresholds work cleanly with any flooring changes.
How to Plan Lounge Zones for Guest Interaction and Movement
Begin with a simple map: how many people you want seated at once, where you want them to gather, and how staff will service the space.
Practical planning guidelines that scale well:
- Allocate 10–15 sq ft per seated guest within lounge groupings (more for VIP or high-comfort layouts).
- Build seating clusters in groups of 4–8, anchored by a rug and table so each vignette reads complete.
- Add a few 2-seat pockets at the perimeter for quieter conversations and visual balance.
- Maintain at least 36 inches around major paths; go wider where traffic concentrates (near entries, bars, restrooms, dance transitions).
- Use subtle cues to guide movement: a change in rug/flooring, a warm overhead string line, or a perimeter uplight shift.
- Plan discreet staff routes to bars and service stations so replenishment doesn’t cut through the “guest-facing” lounge moments.
Done well, the lounge feels intimate where it should—and open where it needs to be.
What Are Themed Lounge Design Ideas for Weddings and Corporate Events?
Themes work best when they’re expressed through materials, lighting tone, and finish details—not novelty décor. Keep the furniture silhouettes consistent and adjust textiles, metals, draping, and lighting cues to match the audience and event purpose. Repeatable themes that translate beautifully inside tents:
- Classic Elegance: velvet sofas, chandelier focal points, neutral rugs, satin/clean liners, brass accents
- Modern Minimal: low-profile sectionals, sculptural chairs, warm-white uplighting, sheer ceiling softness, finished flooring
- Relaxed Luxe (Organic): natural textures, layered rugs, ottomans/poufs, warm bistro glow, airy drape choices
- Corporate/VIP Lounge: tailored leather or structured upholstery, subtle brand-color accents, modular seating for networking, discreet AV integration
To adapt any theme, maintain the “grammar” (vignettes, anchors, and clear paths) and adjust the finishes and lighting scenes—so the space remains cohesive, elevated, and functional.
Execution Tip: Turn Design Into a Smooth Install
The easiest way to protect the final look is to plan interiors alongside the tent build—not after.
- Design integration: Coordinate tent, floors, liners/draping, and lighting so the interior reads as one finished environment.
- Operational planning: Confirm lead times early for both structures and interior inventory to avoid substitutions.
- On-site management: Assign one point of oversight for tent, interior, and technical integrations to ensure decisions remain consistent throughout the installation.
That’s how a lounge moves from “good ideas” to a space that feels flawless on event day.
Frequently Asked Questions
What are the benefits of using layered lighting in a tent lounge?
Layered lighting is what makes a lounge feel intentional and elevated after dark. Ambient light creates a flattering overall glow, accent lighting adds depth and highlights focal moments (like a styled vignette or feature wall), and task lighting supports practical needs at bars and service areas. Together, the space feels warmer, photographs better, and stays inviting—so guests naturally linger longer.
How can I ensure my tent lounge is comfortable in varying weather conditions?
Plan climate control early—before flooring, draping, and lighting are finalized. Portable HVAC, radiant heat, and proper ventilation help regulate temperature and humidity, which also protects textiles and flooring from condensation. The key is sizing systems to the tent volume and guest count, then coordinating power and duct routing so everything performs well without interrupting the look.
What role do flooring and draping play in the overall design of a tent lounge?
Flooring and draping are major “finish” elements that make a tent feel like a refined interior. Flooring and rugs define lounge zones, improve footing, and soften sound; draping and liners adjust perceived height, hide structural elements, and help lighting look richer and more dimensional. Used together, they create clear zones and a cohesive, polished atmosphere.
How can I plan the layout for optimal guest interaction?
Build the lounge in conversation-friendly pockets and protect the flow. Place seating groups near focal moments, keep at least 36 inches clear in major walkways, and position bars/service points so they support the lounge without cutting through it. Rugs, lighting shifts, and flooring transitions should subtly signal where to gather and where to move—so the space feels natural, not forced.
What are some stylish bar station ideas for a tent lounge?
Treat the bar like a design feature with smart placement. Use finishes that match the lounge palette (wood/lacquer for classic, metallic accents for glam, clean modern fronts for contemporary looks), place the main bar as a visible perimeter anchor, and add carts or secondary stations near busy lounge pockets to reduce lines. Plan power, refrigeration, storage, and waste discreetly so service stays smooth and the lounge stays pristine.
What are the best practices for selecting rental furniture for a tent lounge?
Start with goals—capacity, formality, and circulation—then choose pieces that complete full vignettes (seating + table + rug), not just individual items. Confirm durability and any required safety specs for tent environments, lock in delivery/setup details, and ask about accessories and backup inventory. This prevents last-minute swaps that dilute the design.
How can I incorporate themes without it feeling overdone?
Express themes through materials, texture, and lighting tone first, then color accents. Velvet seating with chandelier moments reads classic elegance; low-profile sectionals with warm-white uplighting supports modern minimalism. Keep the furniture “language” consistent across zones and carry the theme through details—rugs, metals, draping choices, and bar finishes—so everything feels cohesive.
Conclusion
A truly elegant tent lounge isn’t built from random “pretty pieces”—it’s created through cohesion, comfort, and flow. When furniture, lighting, flooring, draping, climate, and service points are planned as one interior, the lounge becomes a destination guests remember. Explore Skyline’s premium tent interior options and let our team help translate your vision into a lounge that looks stunning and works flawlessly on event day.